Order Portal
This guide will walk you through the setup process and how to send an invitation to buyers to join the platform and engage with contracts. This page is designed to streamline the collaboration between sellers and buyers within the rail logistics industry.
You will want to start your use of this module by getting set up with all relevant information you will require to fill out a contract and create a shipment.
Getting Set Up
When you are creating contracts to do business with partners, it is important to have all your parties, facilities, and products set up within your companies 'Configuration' page.
Parties
To add parties, click on the green 'Add Party' button to open the 'Add Party' form where you will provide information about the new party.
*Note, you must have default sales and purchase parties to create the respective contracts. You also need to set up the Invitee as a party in order to add them to your contract as a 'Partner'.
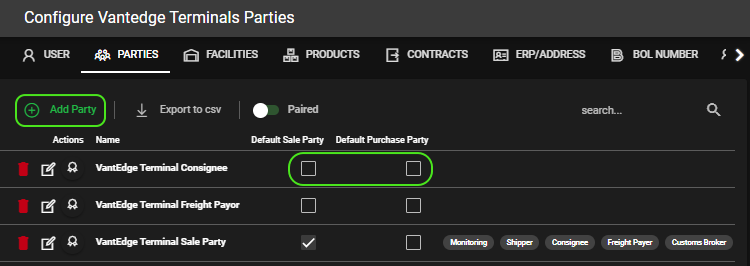
In the 'General' section, input the essential details of the party:
- Name: The official name of the party or company.
- Party Types: Define the role of the party (e.g., consignee, shipper, freight payer).
- Related Company: If the party is associated with a larger or different entity, select it here.
- Locations: Assign a predefined location.
If applicable, include an 'Emergency Response Plan', necessary 'Contacts', and any 'Extras' for the party by expanding the relevant sections.

Once all relevant information has been entered, click the green 'Save' button to add the party to your list. You can now utilize this party in contracts.
Facilities
To add facilities, click on the green 'Add Facility' button to open the 'Add Facility' form where you will provide information about the new facility.
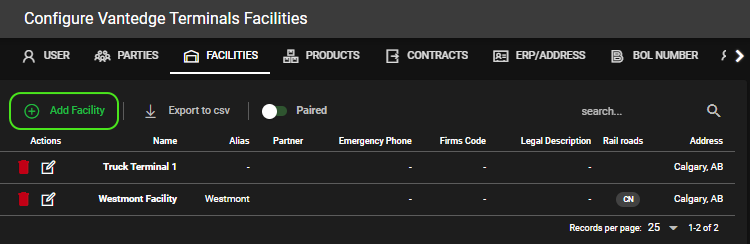
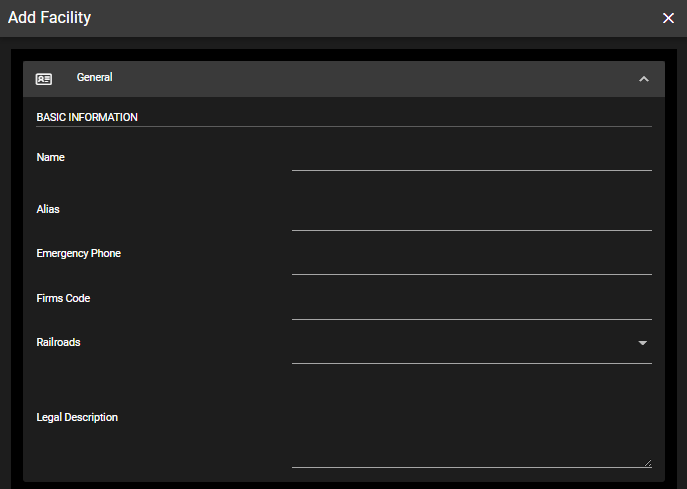
Within the 'General' tab of the 'Add Facility' form, select and fill in the following fields:
- Name: The official name of the facility.
- Alias: Any alternate name or abbreviation the facility.
- Emergency Phone: A contact number for emergencies.
- Firms Code: The facility's FIRMS (Facilities Information and Resource Management System) code.
- Railroads: The railroads that service the facility.
- Legal Description: A legal description of the facility, if applicable.
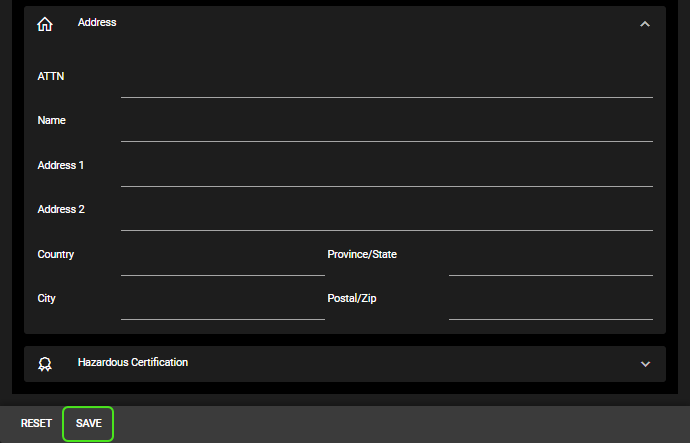
Once 'General' is filled, go to the 'Address' section to input more specific information:
- ATTN: The person or department to contact at this address.
- Name: The name associated with the address, if different from the facility name. If the same, copy and paste from above.
- Address 1 & 2: The street address for the facility.
- Country/Province/State: The country and the state or province where the facility is located (enter in short form, i.e. CA/AB).
- City/Postal/Zip: The city and postal or zip code of the facility.
If your facility handles hazardous materials, you can provide certification details in the 'Hazardous Certification' dropdown. After ensuring all the details are correct, click the 'Save' button to add the facility to your network.
Products
To add facilities, click on the green 'Add Product' button to open the 'Add Product' form where you will provide information about the new product.
Basic Information
Enter Basic Information:
- Name: Specify the product name.
- Density: Provide the density of the product, often required for shipping purposes.
- Gallon to Liter Conversion Factor: If applicable, provide the conversion factor for volume measurements.
- Default STCC (Standard Transportation Commodity Code): Input the STCC, the standardized code used to classify freight.
- STCC Aliases: Add any alternate STCC codes relevant to the product.
- Product Type: Select the product type from a predefined dropdown list.
After entering all necessary details, click the 'Save' button to store the product information in the system.

Extra Information
To add any additional details, expand the 'Extra Information' section:
- EDI Compatible Name: Electronic Data Interchange (EDI) name for the product, if different from the standard name.
- STCC: Reiterate or provide additional STCC codes here.
- Hazmat Class: If the product is hazardous, indicate its classification.
- Packing Group: Include the packing group for reference during shipping.
- Commodity Code: Provide the code that identifies the commodity type.
- HTS (Harmonized Tariff Schedule): State the HTS code for international trade purposes.
- Unit: Specify the unit of measure.
- UN Code: If applicable, list the United Nations code for the product.
- Harmonized Code: Another code for the standardized identification of products.
- Cas: Include the chemical abstracts service number, if relevant.
- Placarded: Indicate whether the product requires a placard for transportation.

Mexico Shipment Requirements
If the product will be shipped to Mexico, fill out the 'Mexico Shipments Requirement' section with appropriate codes and descriptions to comply with regulations.
- UNSPSC: The United Nations Standard Products and Services Code for the product.
- UNSPSC Description: A descriptive explanation of the UNSPSC.
- MTC, MHC, MPC, MHP, MMT: Provide specific codes as required for Mexico shipments, which may include transport, handling, and other classifications.

Contract Creation
Once all of your information has been entered for your contracts within the 'Configuration' section, you can start creating contracts for your partners using the 'Contract' section of Wheelhouse.
Begin by selecting the 'Sale' option to create a new sales contract.

Contract Details
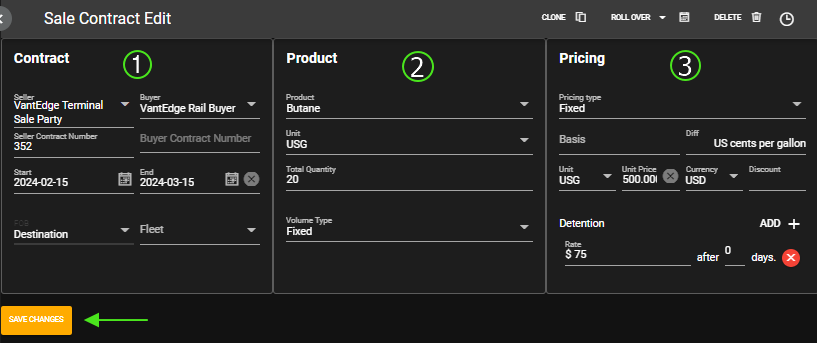
Creating a contract will require three areas to be filled out and is visible in the image below.
-
Contract Information:
-
Seller and Buyer: Identify the VantEdge Shipper and the VantEdge Rail Consignee.
- Contract Numbers: Enter the seller and buyer contract numbers.
- Start and End Dates: Specify the effective date range of the contract.
-
FOB Terms: Define the terms of sale, such as who pays for shipping and loading costs.
-
Product Details:
-
Product: Select the product being sold, such as Butane.
- Unit: Choose the unit of measurement for the product.
- Total Quantity: State the total amount of product included in the contract.
-
Volume Type: Indicate the type of volume measurement.
-
Pricing:
-
Pricing Type: Determine how the product is priced (e.g., fixed, indexed).
- Basis and Unit Price: Input the basis for pricing and the per-unit cost.
- Detention Rate: If applicable, add detention fees for delayed shipments.
Once you are satisfied with your contract details, select the yellow 'Save Changes' button before proceeding.
Decide which parties involved in the contract should automatically receive the Bill of Lading (BOL) upon shipment confirmation. Ensure the required emails are also selected to recieve notificaitons for this contract.
You can use the 'Select All' option to quickly select all parties. Alternatively, choose individual parties such as the consignee, shipper, or custom broker.
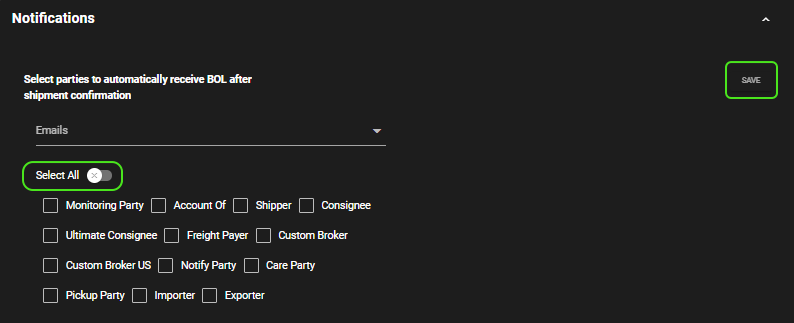
After all details are entered, and parties are selected, ensure to save the contract 'Notifications' by clicking the 'Save' button. This will record the contract within the system and trigger notifications as set.
Creating Invitations
Inviting partners to collaborate on the Wheelhouse platform is a straightforward process. There are three types of invitations available: Rail Contracts, Rail Shipments, and TerminalBOSS Tickets. Here's how sellers can extend invitations to buyers and set up rules for default parties.
Rail Contract Invitations
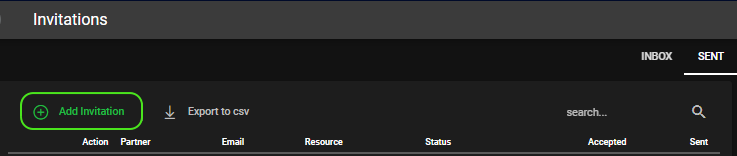
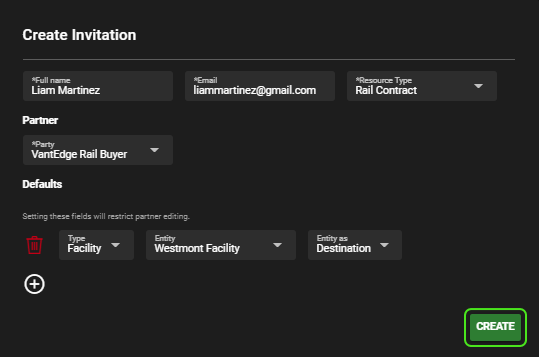
To create 'Rail Contracts' invitations, navigate to the 'Invitations' section and begin by clicking the 'Add Invitation' button to initiate a new partnership.
Fill out the invitation form with the necessary details:
- Full Name: Enter the full name of the individual or the entity being invited.
- Email: Provide the email address where the invitation should be sent.
- Resource Type: Choose the relevant resource type for the invitation.
- Partner: Select the partner you are connecting with from the dropdown menu.
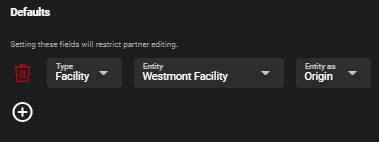
- Defaults: Set any default parameters for the facility or origin, if necessary.
Setting Defaults
The 'Default' rules allow you to set specific entities as standard that restrict partner editing, ensuring that certain standards are maintained.

Review the details, and when ready, click the 'Create' button to allow for the invitation to be sent.
Confirm and Send Invitation

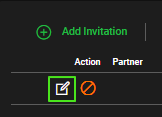
Review the 'Invitation' you just created, and if everything looks correct, select the green arrow to send it to your newest partner. The status of the invitation will be tracked, showing whether it has been sent and whether the invitee has accepted it.
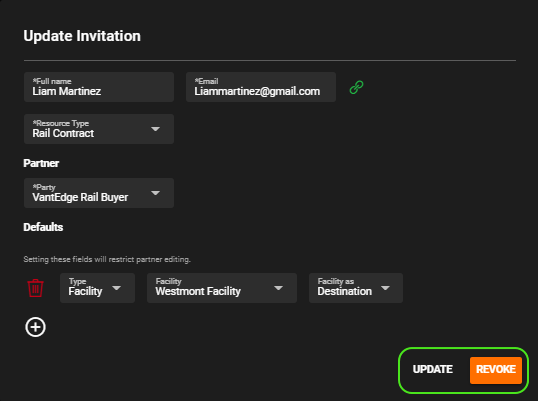
If fields or details regarding an invitation need to be changed, you can always select the edit icon to view your invitation.
Once you have made the necessary changes you can select 'Update' for the invitation to reflect your latest edits. You may also choose to 'Revoke' an invitaiton (using the orange icon) to remove any partners' access.
Invitee Client
In our example, we will be going through the actions of the invited buyer partner and their required actions to schedule cars for shipping, alongside defining the destinations and relevant parties.
Accepting Invitation
Once a Wheelhouse client has sent their invite, you will recieve an email notifying you that you are now able to begin your onboarding and setup.
To accept your invitation, simply select the 'Accept' button. If the button does not immediatly work, reopen the invitation email and click on 'accept the invitation'.
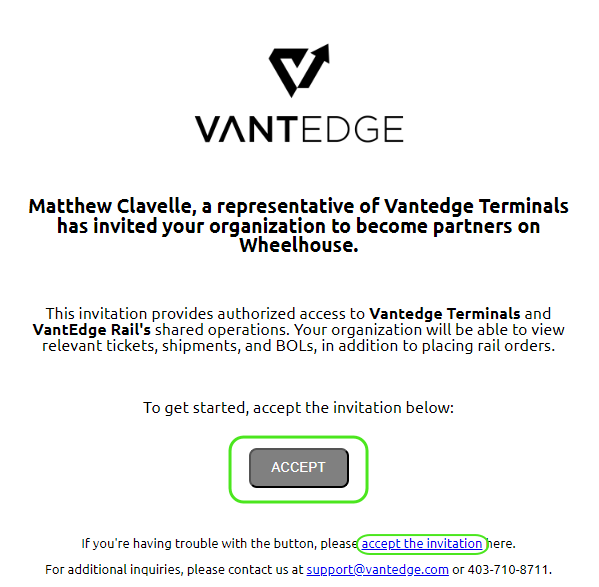
When you log into Wheelhouse, you will be able to see the new connected invitation to your partner.
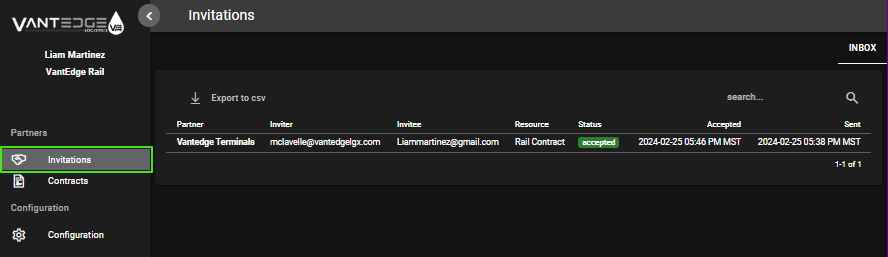
If you are a new client and user of Wheelhouse, you will need to create your 'Parties' and 'Facilities' before you are able to create shipping schedules - this includes selecting your destinations, relevamt parties and number of cars on defined days. For this, please refer to the 'Getting Started' sections at the top of this help document.
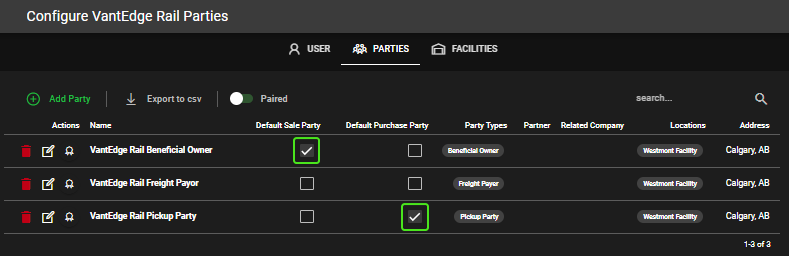
Example Buyer Parties
Example Buyer Facility
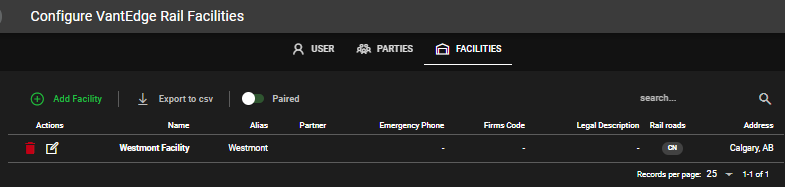
Once you have followed those steps to set up your necessary parties similar to the examples above, you may begin creating your shipping schedules.
Scheduling Shipments
This section of the workflow guide details the steps a buyer would take in VantEdge Rail to create and manage shipping schedules and orders after accepting an invitation. To begin scheduling shipments from the Order form your Inviter sent you, select the edit icon beside the order.
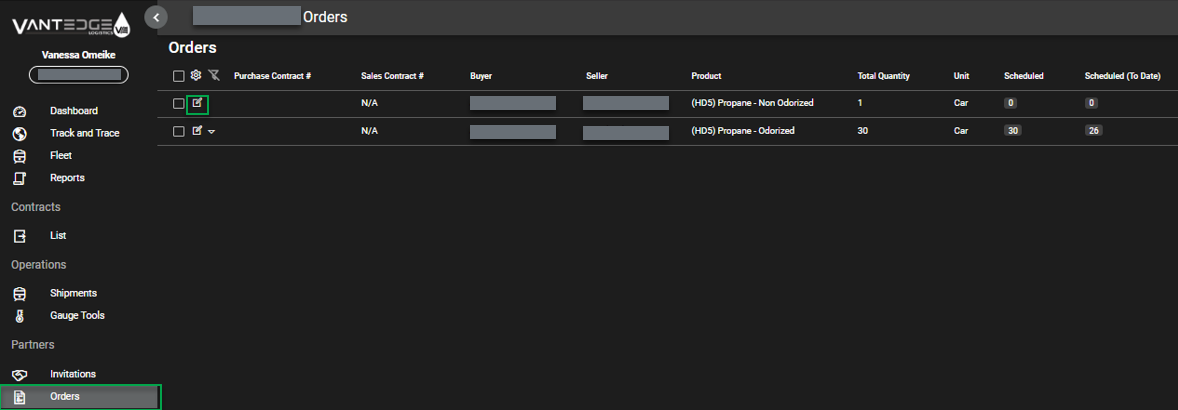
Once you open the order form, you will be shown the details pertaiing to the contract the Seller sent. The dashed "----" lines under fields are created/enforced by the seller and are not available for editing.
When you are ready, select the plus button to begin making your 'Shipping Schedule'.
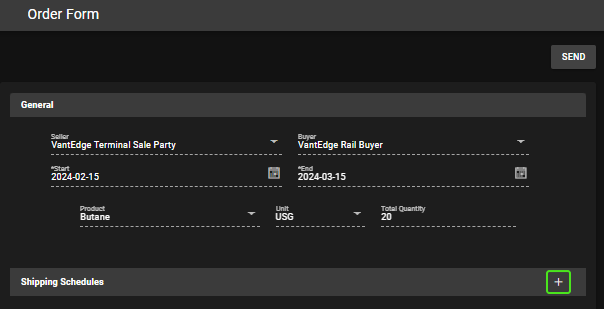
Schedule Overview
The 'Shipping Schedules' overview page contains access to all areas required for specific shipments via dropdown menus for clearer organization. The plus icon in the upper right corner indicates the ability to add additional shipping schedules to the one you just created.
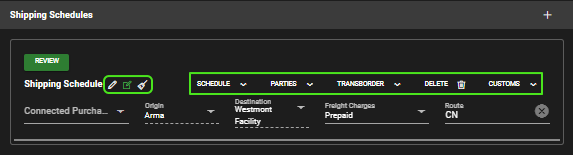
There are several action buttons and dropdown menus available and you can save anytime with the green icon beside 'Shipping Schedule':
- Schedule Dropdown: Allows users to view and schedule their allocated quantity of cars.
- Parties Dropdown: To select or review the parties involved in the shipment.
- Transborder Dropdown: To manage or review any cross-border transit requirements or details.
- Delete Button: To remove the shipping schedule if no longer needed.
- Customs Dropdown: Provides options to manage customs-related information for the shipment.
You can choose to have all dropdowns open at once or open one by one for clarity. The following sections will dive into these dropdowns and their role in your shipment scheduling, and many fields update automatically.
Shipping Schedule
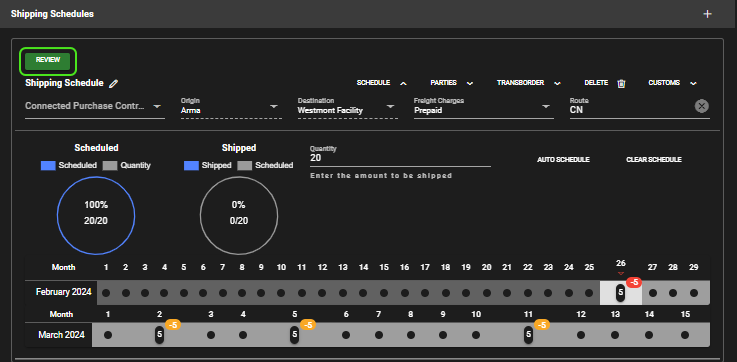
In 'Schedule', a user must enter the 'Quantity' to be shipped in the text box and they can choose the options to either 'Auto Schedule' or 'Clear Schedule.' The timeline below shows more days, indicating a longer timeframe to manage scheduling for shipments. If there is more than one month in the contract period, the second month would be outlined below such as March after February in stacked fashion.
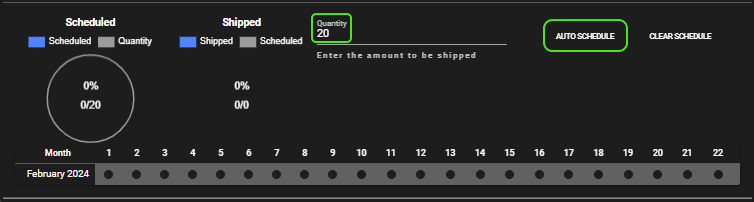
Auto Scheduling can be a useful tool to quickly allocate your shipment over aspecific periods of days. Simply enter the 'Batch Size' or number of cars on a given day and set the interval they will be shceduled for in the 'Periodic Days' field.
Once you have filled out both fields, select 'Auto Schedule'
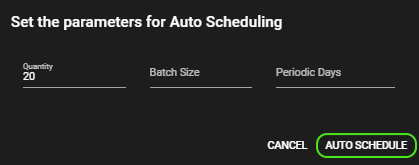
If you would like to manually enter a number of cars to be shipped on a specific day, simply hover over a black dot underneath the desired day of the month. A '+' symbol should appear for you to select and enter your quantity in the 'Schedule Cars' pop-up.

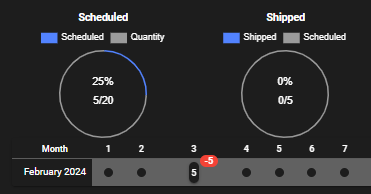
Upon completing your schedule, you will see the graphical representation of shipping data change, specifically focusing on scheduled and shipped.
Shipping Parties
The 'Parties' form is dedicated to defining the roles and parties involved in shipping operations. This interface allows users to assign various stakeholders to their respective roles in the shipment process. Each role is represented as a dropdown menu, where users can select from a list of predefined options.

Any 'Parties' previously entered as defaults by the seller in this case, will be unable for editing and are recognized by the dashed line below '----'.
Transboarder Shipments
This section is dedicated to capturing specific details necessary for shipments that cross international borders:
- Customs Entry Type: Users can select the type of customs entry required for the shipment, which dictates the customs clearance process.
- Parties are related?: This checkbox is likely a declaration whether the shipper and consignee are related parties, which can be relevant for customs valuation.
- Export Declaration Type: Here, users specify the nature of the export declaration, which is a mandatory document for international shipments.
- Export Reference Number: A field for entering a reference number that corresponds to the export declaration, providing a tracking identifier for the shipment.

Customs
The customs section gathers essential details related to the customs process of the exporting country:
- US Custom Broker: Dropdown to select which party, previously created, will be clearing hte goods though customs.
- US Custom Office: Dropdown to select the specific US Customs Office that will handle the shipment's entry, if shipping from the United States.
- Shipment Payment Method: Dropdown to select how the shipment costs will be settled, whether prepaid, collect, or otherwise.
- Basis Of Price: Users can provide information on how the goods' prices are determined.
- Estimated Days to Border: An estimation of the transit time to reach the border.
- Freight Cost Per Barrel (USD): The cost of freight on a per-barrel basis, if applicable.
- Parties are related?: Similar to the first section, indicating the relationship between the parties involved in the shipment.
- Estimated Freight Charge To Border (USD): An estimated cost for transporting goods to the border.

Shipment Review
Upon the completion of all relevant areas to schedule your shipment, select the green 'Review' button.
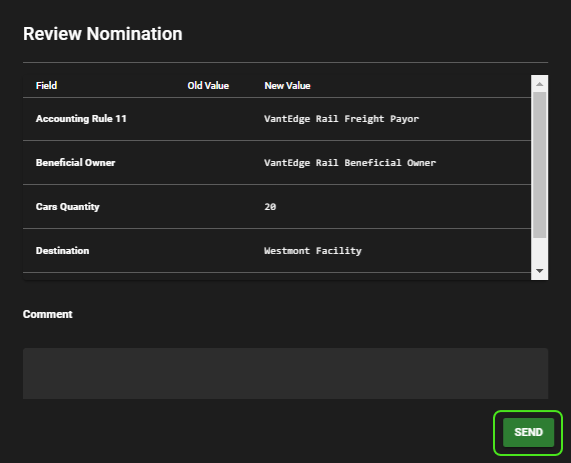
Once you have selected 'Review' above, you will see the 'Review Nominaiton' page displaying the summary of your shipment. You will be able to add any necessary comments, and after completion, select 'Send'.
A message will appear confiirming that your nominaiton has been sent. The responsibility is now on the 'Seller' to approve the nomination. Those steps will be covered in the next section.
Inviter Nomination Approval
Once the 'Invitee' has completed and sent their nomination, an email will be deilvered to your inbox informing you of the new rail order you need to review.
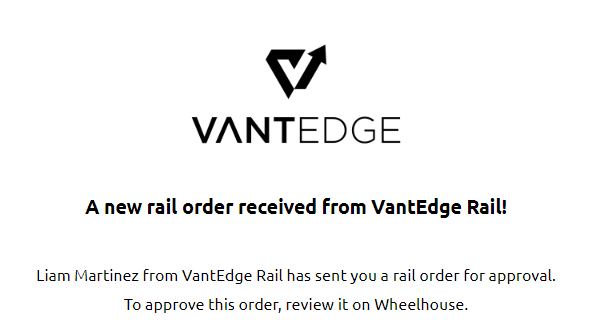
On Wheelhouse, open your contracts list to view your active contracts and nominations. You will need to find your newest nomination via search or filter and select the edit icon.
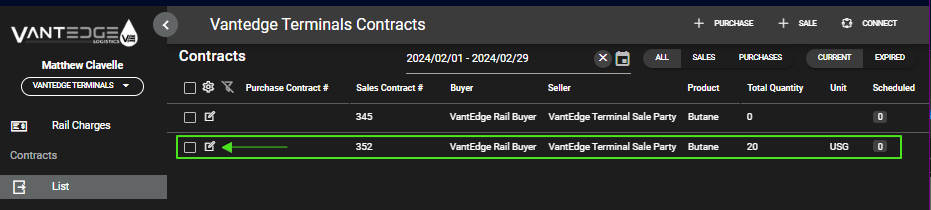
After opening the Contract form, select the 'Shipping Schedule' dropdown to see the green 'Review Nomination' button. Selecting the review button will bring up a screen for you to see information for the nomination.
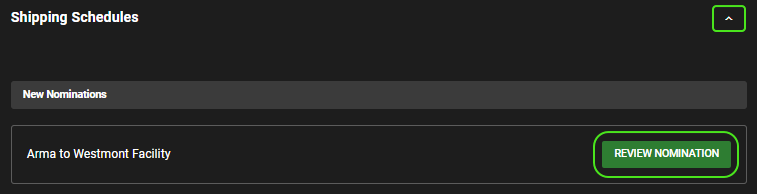
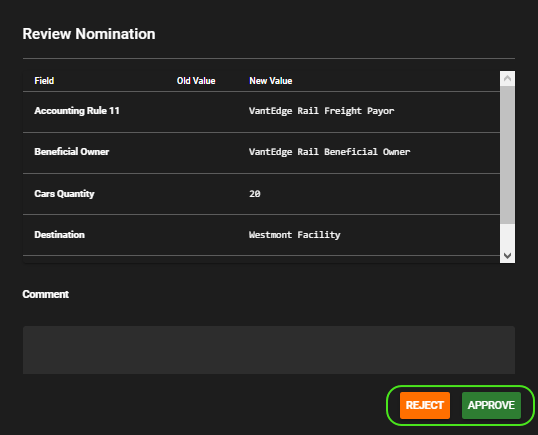
The nomination summary will display important information entered by the 'Invitee' for the schipment schedule againt your contract. Once you review and are satisfied with the details of the nomination, enter any relevant comments and select 'Approve'.
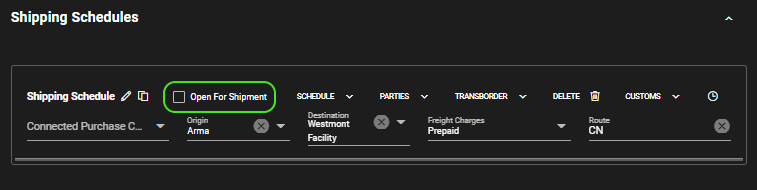
By approving the nomination, the 'Inviter' will now see the more detailed 'Shipping Schedule' form from the contract you initially created as an 'Inviter' and open the nomination for shipment.
Confirmation for Invitee
Upon the approval of the 'Inviter', an email will be sent to the 'Invitee' informing them that their nomination has beeen approved.
As an 'Invitee', once your nomination is approved and 'Open For Shipment', you will then be able to see your completed nomination and reference how many are scheduled and shipped under 'Contracts' > 'List'.